In this tutorial, you will learn how to make a purse for a child. Here in the UK, we call this a handbag. To us, a purse is the small, usually zipped, pouch you use for coins and notes. As most of our members are from the US, I’ll use American terminology but will add British terms in brackets.
Please don’t be put off by the length of the tutorial and the number of photographs. It is really quite straight forward but I wanted to show each step so that even a relative beginner can make this.
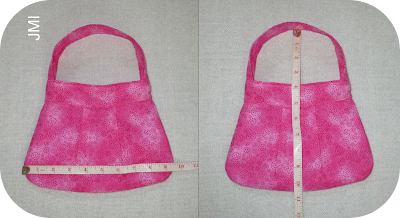
Size of finished item: 9 ½ inches (24 cm) wide by 10 ½ inches (26.5 cm) high including the handle (6 ½ inches (16.5 cm) high not including the handle). All measurements are approximate.
Use a quarter inch (6-7 mm) seam allowance. Be sure to start and finish each section of stitching with reverse or locking stitches.
Variations
You could add a snap, press stud or some other type of closure at the top if you like. You could gather the top on the main outer piece rather than pleat it. You could add lace or a trim like ric rac to the seam where you join the top band. If you want to save time or fabric, you can make the outer in the same way as the lining, with no pleating. Or you could pleat just the front of the purse and leave the back flat. In this case, use the lining pattern piece instead of the outer pattern piece.
You will need:
- Free pattern:
- Sewing Machine
- Iron
- Fabric for the outer and the lining – see Step 1 for the size you need
- Batting - known as Wadding in the UK* - 20 inches x 8 ½ inches (50 cm x 21.6 cm)
- Thread
- Scissors
- Pins (and/or clips)
- Tape measure or ruler
- Tailor's chalk, pencil or fabric marker
- Rotary cutter, mat and ruler – optional
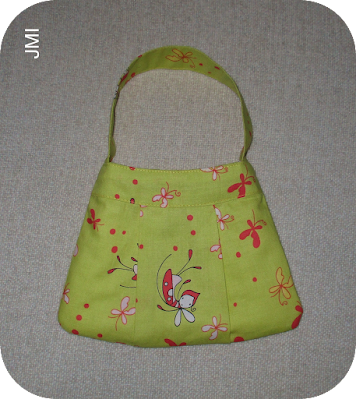
* you don’t have to use batting if you prefer not to. I use a thin batting to give a bit of body without being too bulky to fit nicely inside a shoebox. I used a thicker wadding for this yellow version I made a few years ago.
A note on printing the pattern
Please note that in order to print the pattern to the intended size, you may need to adjust the settings on your computer before you print. This is because the printer may want to add margins. Every pdf reader is different so I can’t tell you exactly how to do this. However, look for a section called ‘print settings’ or ‘preferences’ or ‘page set up’. Choose ‘fit to page’ or ‘fit to paper’ or ‘borderless printing’. Do not choose ‘fit to printable area’ or ‘shrink to printable area’.
If your pattern does print out slightly smaller than mine then please don’t stress about it as it is not the end of the world. The purse will still be a good size even if it is a quarter or half an inch (6 – 13 mm) smaller than mine at the end. Alternatively, you could cut slightly beyond the lines when you cut the pattern pieces out from the paper or you could add a seam allowance when you cut the fabric out. Just remember to do this to all the pieces so that they will fit together.
Step 1
Cut your fabric to size using your pattern. A piece 17 x 17 inches (43.2 x 43.2 cm) will just be large enough for the outer parts of the purse, the tops and the handle. See the pictures for a cutting guide. You can cut a longer handle if you prefer but will probably need more fabric.
You will need a piece for the lining that is 10 x 14 inches (25.4 x 35.5 cm).
2 x Outer
4 x Top Band
1 x Handle – 12 x 6 inches (30.5 x 15.2 cm)
Lining Fabric:
2 x Lining
TIP - if you use a fat quarter, you will have enough left over to make a scrunchie or headband to match.
Step 2
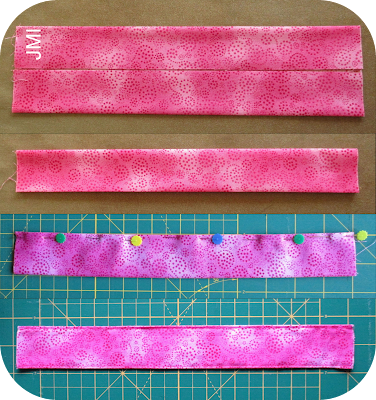
Let's make the handle first. Lay the handle piece face down and fold it in half so that the two long sides are on top of each other and press with the iron. Open up and refold one raw edge in to meet the crease you just made and press again with the iron. Repeat on the other side. You should now have three neatly pressed creases in your handle.
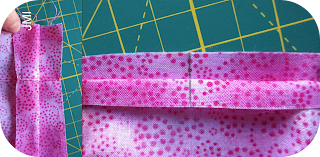
Fold the handle up so that the raw edges meet in the centre and fold again to hide them. Pin or clip the handle piece ready to sew. Sew down each side of the handle close to the edge. Do the open side first then the folded side. Put it to one side.
TIP - I used a blind hem foot to keep my stitching an even distance from the edge of the handle.
Step 3
Now let's move on to the main part of the purse. Take one of the outer pieces and lay it down on top of the pattern piece near the top but far enough down so that you can see the markings. Copy the markings at the top onto the wrong side of the fabric using chalk or a marker than can be removed later. Copy the centre markings on the top and bottom edges as well for later – do these ones on the right side of the fabric.
We are now going to pleat the fabric. You have the choice of an inverted or box pleat. In this picture, the top is an inverted pleat and the bottom is a box pleat. I chose a box pleat. Choose the one you prefer the look of and follow the instructions for that one.
Inverted pleat
Look at the three marks to the left of the centre mark. Imagine they are labelled 1, 2, 3.
You are going to fold the fabric into a Z shape. Make a small crease with your thumb and first finger at point 2. Fold so that 3 goes on top of 1 and 2 goes to the right. Flatten the Z and put a pin in it. Do the same on the other side but this time you need to create a reverse Z shape. The 1 goes on top of 3 and 2 goes to the left. Add another pin.
This diagram shows the shape you are trying to achieve in cross-section.
When you turn it over to the right side, this is what you should have.
Box pleat
Look at the three marks to the left of the centre mark. Imagine they are labelled 1, 2, 3.
This diagram shows the shape you are trying to achieve in cross-section.
When you turn it over to the right side, this is what you should have.
Baste (tack) by machine or by hand to keep the pleat in place. If you baste within the seam allowance then you won’t need to unpick the stitches at the end.
Repeat with the other outer piece.
Step 4
Next we have to join the top band to the outer piece. Find the centre of both pieces by folding them in half or use the markings from the pattern pieces.
Go to the end of the top band, line up the two layers at the side and pin. Do the same at the other end so you have three pins.
Repeat with the other outer piece.
Step 5
Sew across the top. Be very careful not to hit the pins with your needle. Remove them just as you come to them or go very slowly. You may prefer to baste (tack) this seam by hand first.
Sew the top bands to both the outer pieces.
Open out and press.
Top stitch.
The two pieces should look like this now.
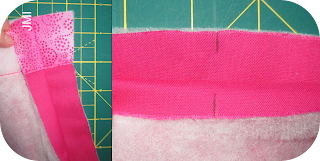
Place the two pieces right sides together. Match up the seams at the side so they are level. Match up the centre markings on the bottom edge.
Pin or clip then sew all the way round using a quarter inch (6-7 mm) seam allowance.
To help the curves turn out nicely, you will probably need to clip into the seam allowance on the curves. Cut slits or small Vs on the curved areas but be very careful not to cut through the stitches.
Turn the bag right side out and press.
Put to one side with the handle.
Step 6
Next we have to join the top bands to the lining pieces. Transfer the centre markings from the pattern piece to the fabric as before. The pinning process is the same procedure as step 4 although the lining pieces do not have a pleat in them.
Sew and press but do not top stitch yet.
.png)
Step 7
Now we will add the batting (wadding) to the lining pieces. Usually with bag making, you add the batting to the outer layer but I do it this way as I think it’s easier to add it to flat pieces than with pleated pieces. You can do it the other way if you prefer.
Lay the lining pieces down on top of your batting and smooth out.
Using pins, safety pins or basting spray, secure the fabric to the batting to hold it in place while you quilt.
I quilted by top stitching through both layers but you can do it as you prefer. Lengthen your stitch length slightly when sewing through batting.
Step 8
Place the two pieces right sides together. Match up the seams at the side so they are level. Match up the centre markings on the bottom edge. Pin or clip.
Step 9
Now let's add the handle you made earlier. Take the handle and fold it in half widthways to find the centre. Add a pin or mark the centre with a pen or chalk.
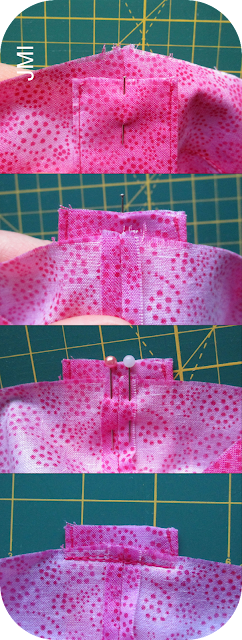
Take the outer section of the bag. Line up the centre of the handle with the side seam of the bag. Let the handle extend by about quarter of an inch (6-7 mm). Flip over and pin. Sew across the end of the handle two or three times to ensure it is really secure. Make sure that your stitches are within the seam allowance of ¼ inch otherwise they will be visible on the outside at the end and we don't want that.
Take the other end of the handle and do the same on the other side. Make sure that the handle is not twisted.
In order to stop the handle moving or riding up at the next stage, I found it helpful to add a pin a bit lower down to keep it in place. Don’t forget it’s there or you might stab yourself with it later.
Step 10
Now we are going to join the inside and outside of the purse. The two parts should look like this at this stage. The outer bag is turned the right side out, and the lining is the wrong side out. I’ve just pushed the lower section of the outer bag into the curve of the handle to make it a bit easier to manoeuvre.
Place the outer bag inside the lining so that the right sides of the fabric are facing each other.
.png)
Match the raw edges up at the top then match the side seams. I put a pin through the centre of the seam on one side and made sure it came through at the same point on the other side.
Pin or clip to hold in place. Do the same on the other side seam then add other pins or clips around the top to hold the two pieces together.
Sew all the way around the top edge. My sewing machine has a free arm so I used that to sew round the top more easily. I’ll admit that I used a 3/8 of an inch (1 cm) seam allowance rather than a quarter inch (6-7 mm) to make sure that I caught all the raw edges in my seam. It may have been easier to see the top edge if I had flipped the outer (unquilted) side to the top but I didn’t want to risk catching the batting in the feed dogs. Just do it the way that suits you best.
Here's how it should look at this stage.
Now you need to turn it all the right way out through the turning gap you left earlier. Be gentle so that you do not rip your stitches.
It will look like this - you get a sort of butterfly shape. Give it a nice press but be careful if you are using a polyester wadding as a high temperature could melt it.
Step 11
Sew up the turning gap in the lining. You can use your machine but I like to do it by hand using a ladder stitch.
If you are not sure how to do this, watch this YouTube video by
OnlineFabricStore.net:
Push the lining inside the main bag. Roll the top edge of the bag between your fingertips to make sure that the seam is right on the top.
Pin or clip to hold it in position.
Top stitch all the way around.
Ta-dah – your purse or handbag is now complete!
If you use this, or any of our patterns, we'd love to see photos of what you make. You can send them to craftingforshoeboxes[at]gmail[dot]com or post them on our Facebook page.
%20-%20Copy.png)
.png)
.png)
.png)
.png)

.png)
.png)
.png)
.png)
.png)


.png)

.png)
.png)
.png)
.png)
.png)

.png)
.png)

.png)
.png)
.png)
.png)
.png)
.png)
.png)
.png)
.png)
.png)
.png)
.png)
.png)
.png)

.png)
.png)
.png)

.png)
.png)
.png)
.png)
.png)
.png)
.png)
.png)
.png)
.png)
.png)
.png)
.png)
.png)
.png)
.png)
.png)
No comments:
Post a Comment
Do feel free to leave comments but please note that we will moderate them before publishing them