
In this tutorial, you will learn how to make a little bed for a mini baby
doll. Here in the UK, we call this a carry cot. However, I'm told this is not a term that is used in the US and to call it a "baby doll carrier bed" may be more appropriate.
The fabric sizes given here will result in a carry cot to fit
the Little Baby Doll from Wilkinsons in the UK (sadly now discontinued). These sweet dolls
measure 6 ¾ - 7 inches (17 - 18 cm) from head to toe.
This size also fits the 7" baby doll from Dollar Tree which is available in two variants - Caucasian and African American (also now discontinued).
If you want
to make one for a different sized doll, please scroll to the bottom
of the post to see how to alter the pattern. The figures in the
square brackets [ ] refer to that section.
If you use this, or any of our patterns, we'd love to see photos of what
you make. You can send them to craftingforshoeboxes[at]gmail[dot]com
or post them on our Facebook page. Happiness is handmade.

This lovely carry cot was made by one of our members, Jean. She also crocheted the little bear nestled inside it.


Katherine made this sweet little bed for one of the Dollar Tree baby dolls. As you can see, she fits perfectly inside without having to make any adjustment to the pattern.

Linda made this lovely bed for a tiny doll who is only 1.5 inches long. Great job Linda!

You
will need:

- Sewing Machine
- Iron
- Fabric
- Wadding - known as Batting in the US
- Thread
- Scissors
- Pins (and/or clips)
- Tape measure or ruler
- Tailor's chalk, pencil or fabric marker
- Rotary cutter, mat and ruler - optional
Step
1
Cut
your fabric and wadding (batting) to size.
Fabric
Two main pieces - 11 ½ x 12 inches (29.2 x 30.5 cm)


Two main pieces - 11 ½ x 12 inches (29.2 x 30.5 cm)
One is for the inside of the cot and one is for the outside. I used the same fabric for both but you could choose two different ones.
Two handles – 3 x 10 inches (7.6 x 25.4 cm)

Two pieces for the back and front of the quilt – 5 ½ x 5 ½ inches (14 x 14 cm)
Two pieces for the back and front of the pillow – 3 ½ x 4 ½ (8.9 x 11.4 cm)

Wadding
(batting)
Place
one of the main pieces on top of the wadding (batting) and cut around
it, leaving a border of about ½ inch (1.3 cm) all round.


Cut
wadding (batting) about the same size as the quilt (one piece) and
pillow (two pieces - for extra puffiness).
TIP
- at Step 5 you will trim excess wadding (batting) from the main
piece so you could wait before cutting the wadding (batting) for the
pillow then use the spare pieces for it.
Step
2
Let's
make the handles first.
Fold the handle so that the two long sides are on top of each other and press with the iron.


Step 3
Fold the handle so that the two long sides are on top of each other and press with the iron.

Open up and refold one raw edge in to meet the crease you just made and press again with the iron.

Repeat on the other side.

You should now have three neatly pressed creases in your handle. Repeat with the other handle so that you have two the same.

Step 3
Fold
the handles up so that the raw edges meet in the centre and fold
again to hide the raw edges.


Sew down each side of the handles close to the edge. Do the open side first then the folded side. You can chain piece if you like. Sew both handles then put to one side.


Pin or clip the handle pieces ready to sew.

Sew down each side of the handles close to the edge. Do the open side first then the folded side. You can chain piece if you like. Sew both handles then put to one side.


TIP
- I used a blind hem foot to keep my stitching an even distance from
the edge of the handle.
Step 4
Now
let's move on to the main part of the carry cot.
Take one of the main pieces – the one you want to use for the inside of the cot. Lay it down with the side measuring 12 inches [A] at the top. Fold it up so that the two sides measuring 12 inches are on top of each other. This is important as the other two sides look a similar length but the baby doll may not fit inside the cot at the end if you put the incorrect two sides together at this stage.
Take one of the main pieces – the one you want to use for the inside of the cot. Lay it down with the side measuring 12 inches [A] at the top. Fold it up so that the two sides measuring 12 inches are on top of each other. This is important as the other two sides look a similar length but the baby doll may not fit inside the cot at the end if you put the incorrect two sides together at this stage.
Pin
across the top to stop the fabric moving. You are now going to cut
the bottom corners out. Take a ruler (or tape measure) and lay it on
the FOLDED edge. Mark and cut out a piece measuring 3 ½ x 3 ¼
inches (8.9 x 8.3 cm) [C x D] as shown in the picture. Repeat on the
other corner.


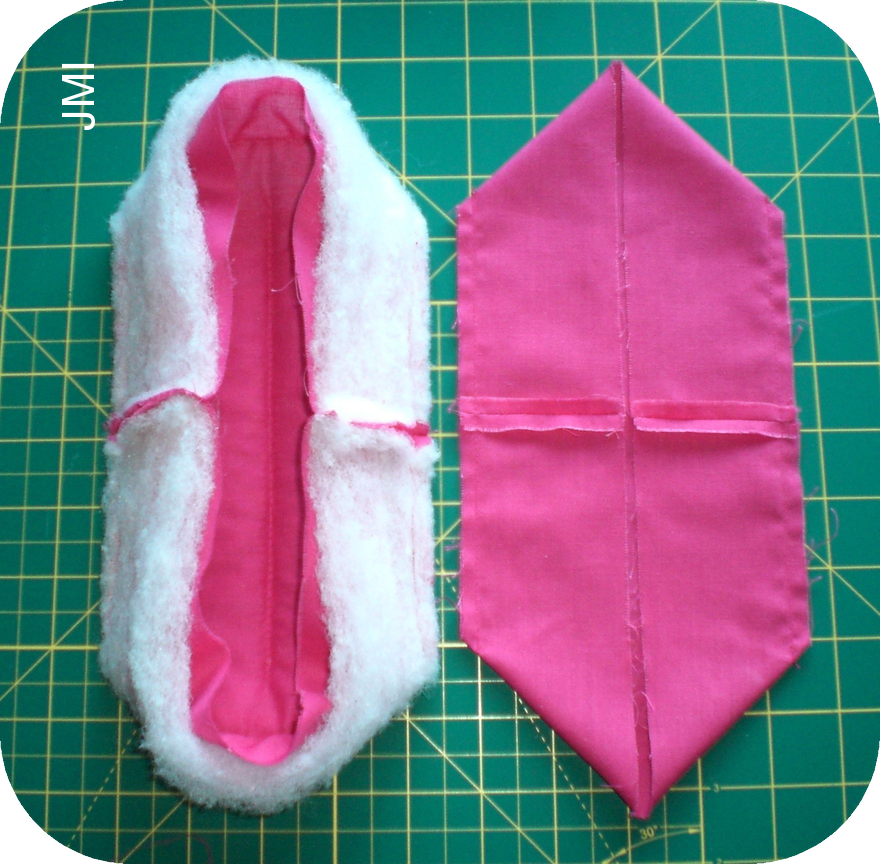
When you open it out, it will look like a large letter I. Place it on top of the wadding (batting) and set to one side.

Repeat
the process on the other piece of main fabric – the one that will
be the outside of the carry cot.
Step
5
Quilt
the inside piece as you wish. I am a novice quilter so I just sewed
some simple lines as shown.


Trim away the excess wadding (batting) - you could use this for the pillow.

Step
6
Fold
the piece with right sides together as shown and clip or pin.


Sew down the two short sides, using a ¼ inch (0.6 cm) seam allowance. Be sure to start and finish each section of stitching with reverse or locking stitches.

Step
7
Now
let's form the basket shape. It's a little bit difficult to explain
so use the photos as a guide. If you are familiar with bag making
techniques, this is like creating a boxed or 'sugar bag' bottom.
Open up the piece and re-position the short seams so they would be at
North and South on a compass.


Sew the pinned sides on both pieces, using a ¼ inch (0.6 cm) seam allowance and leaving a 2 ½ - 3 inch (6.4 – 7.6 cm) turning gap on just ONE of the four sides. Remember to reverse or lock stitch, especially either side of the gap as this will be a stress point when you turn the item right side out.
This is how your pieces should look at this stage.


Push down and place the two long sides on top of each other.


Clip or pin them together and do the same on the other side. Make sure the side seams are open and flat.

Do the same with the fabric piece for the outside – this is the one without the wadding (batting) attached.
Step 8
Now, before you sew, you need to think about which piece to leave your turning gap in. I left it in the unquilted piece as shown. In hindsight, perhaps I should have left it in the quilted piece as then my hand-stitching would have been hidden inside the carry cot.

Sew the pinned sides on both pieces, using a ¼ inch (0.6 cm) seam allowance and leaving a 2 ½ - 3 inch (6.4 – 7.6 cm) turning gap on just ONE of the four sides. Remember to reverse or lock stitch, especially either side of the gap as this will be a stress point when you turn the item right side out.
This is how your pieces should look at this stage.
Step
9
Now
let's add the handles you made earlier. Take the end of one handle
and place it so that the raw edge of the quilted main piece and the
raw edge of the handle are level. The side edge of the handle needs
to be 1 ¾ inches (4.4 cm) from the short side seam of the carry cot
as shown. Pin it in place.


Step 10


Take the other end of the handle and do the same on the other side of the short seam. Make sure that the handle is not twisted.

Do the same with the other handle on the other side of the main piece.
Sew across the ends of the handles two or three times to ensure they are really secure. Make sure that your stitches are within the seam allowance of ¼ inch (0.6 cm) otherwise they will be visible on the outside and we don't want that.

Step 10
Now
we are going to join the inside and outside of the carry cot. The
two parts should look like this at this stage. The inside piece
(this is the quilted one) is turned the right side out, and the
outside piece is the wrong side out. Open the outside piece up and
place the inside piece inside the outside piece so that the right
sides of the fabric are facing each other.


Match the side seams and pin or clip.

Add other pins or clips to hold the two pieces together.

Sew all the way around the top edge using a ¼ inch (0.6 cm) seam allowance.
I found it easier to see the top edge by flipping the outside
(unquilted) side to the top.


Here's how it should look at this stage.

Now you need to turn it the right way out through the turning gap you left earlier. Be gentle so that you do not rip your stitches.

Step 11
Sew up the turning gap using a ladder stitch.

If you are not sure how to do this, watch this YouTube video by OnlineFabricStore.net:

If you are not sure how to do this, watch this YouTube video by OnlineFabricStore.net:
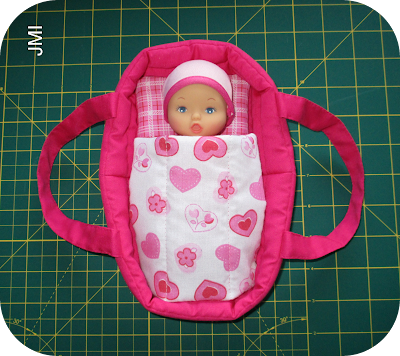
Ta
da – now it looks like a carry cot and it's the perfect size for
dolly!


Step 12
Now
the dolly needs a quilt and pillow to complete her carry cot.
Place
the wadding (batting) down then place the fabric for the front of the
quilt right side UP then add the back fabric right side DOWN.


Turn the quilt and pillow right side out and carefully poke out the corners. Close the turning gap using a ladder stitch as before. I added two simple lines of quilting to the quilt to hold the layers together.


Pin or clip the layers together. Stitch all the way around leaving a turning gap in the side 1 ½ – 2 inches (3.8 – 5.1 cm) long.


Trim the excess wadding (batting) away and clip your corners, being careful not to cut the stitches.


Repeat the process for the pillow. This time, stack the two pieces of wadding (batting) on top of each other at the base of the pile.

Turn the quilt and pillow right side out and carefully poke out the corners. Close the turning gap using a ladder stitch as before. I added two simple lines of quilting to the quilt to hold the layers together.

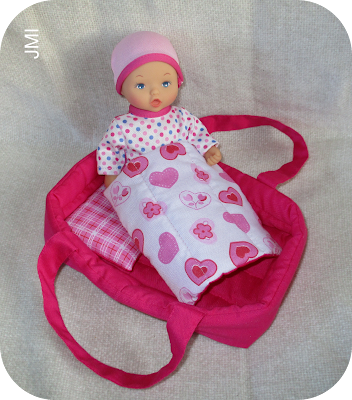
Your dolly's carry cot is now complete!


We
have some other sewing and knitting patterns for the Wilko mini baby
doll – you can find them here.
How
to make a carry cot for a different sized doll
Lay
your doll down on a flat surface and measure it as follows – you
can use the Imperial or Metric system as you prefer:

Width
(W) = across the widest part – usually from one hand or elbow to the other. To allow for ease of use, I added
about ½ inch (1.3 cm) and used this figure instead.

TIP
– round up rather than down to make it easier to place the doll in
the carry cot and take her out again.
Decide
on your seam allowance (SA) – I used ¼ inch (0.6 cm) but it can be whatever
you like. Now you need to do some maths:
H
+ W + SA + SA = measurement A
H
+ S + S + SA + SA = measurement B
Applying
this to the Wilko Mini Doll, where H = 7, W = 4 ½ and S = 2
(inches):
7
+ 4 ½ + ¼ + ¼ = 12
7
+ 2 + 2 + ¼ + ¼ = 11 ½
So
my main piece of fabric has to be 12 inches by 11 ½ inches (29.2 x
30.5 cm).
In
Step 4 of the tutorial, make sure you lay the fabric down with the
side measuring A at the top.
When you cut out the corners, the piece you cut out will be as follows:
When you cut out the corners, the piece you cut out will be as follows:
H
÷ 2 = measurement C (Horizontal)
Measurement
C - SA = measurement D (Vertical)

Applying
this to the Wilko Mini Doll:
7
÷ 2 = 3 ½
3
½ - ¼ = 3 ¼
So
the piece I cut out has to be 3 ½ inches on the horizontal and 3 ¼
inches on the vertical (8.9 x 8.3 cm).
I
will leave it to you to decide if you need to amend the length and width of the
handles and where to position them in Step 9. You may need to leave
a smaller or bigger turning gap in Step 8. I would wait to cut out
the fabric for the pillow and quilt until you have completed Step 11
and then you can work out the size you need.
I'd
recommend using a piece of scrap fabric such as an old sheet to check
your measurements before you use your good stuff – this is what I
did before I started mine.


Just adorable, Cheryl. This would be perfect for a child who is about to have a little sibling. Showcased today...
ReplyDelete
ReplyDeleteThe carrying bag for the baby doll, looks very adorable ... and I will definitely be sewing for my Enekltochters doll soon. Thank you for the well-written tutorial.
Greetings Klaudia from Germany;-)
What is wadding batting?
ReplyDeleteWadding and batting are two names for the same thing. It is the soft squishy layer that goes between the front and back of a quilt. It comes on a roll and you buy it from the store by the yard or metre. It is usually made from polyester or cotton or a blend of the two.
DeleteThank you so much for the directions and tips!! I have a little granddaughter who is going to love this.❤️
ReplyDeleteThank you - that's so nice to hear. I hope she does love it.
DeleteWhat a great tutorial! Pictures make everything so clear. This is just what I have been looking for. Will alter for 10” doll. Thank you.
ReplyDeleteThank you very much for your kind comment.
DeleteI'm trying to make cribs for angel babies would this pattern work maybe without the handles? Or if you have any other suggestion I'd be grateful. Thanks
ReplyDeleteI am afraid I am not familiar with the requirements for an angel baby crib. I have seen them made using curved ice cream tubs with a sewn, crocheted or knitted cover which then hides the plastic base. They look very nice. You should be able to find a pattern on Google or Pinterest.
DeleteHelo, I've been looking at wadding on Amazon and I'm a bit confused as I've never used wadding before. They have 1oz to 8oz which would you recommend to make the carrycot as I need the sides to stand up. Thank you
ReplyDeleteThat's a very good question and I'm afraid I am not quite sure how to answer it. I bought my wadding from a local shop where I could feel that the thickness was what I needed but it was not labelled with the weight. The one I used is polyester, quite stiff and about 1cm thick. It was very cheap (£2.40 a metre) but it does the trick. It is probably 4 or 6 oz but I'm afraid that would be a guess. Could you ask the seller on Amazon if they can tell you which weight fits my description? I'm sorry I can't be more specific.
DeleteSuch a very darling pattern, but I got stuck. When I turned it right side out, my handles were stuck inside. Now I am unsewing to try to fix it. I obviously did something incorrect. But I will keep working on it. I love the finished projects others sent pictures of. Thank you much for all your work with this pattern and thank you for making it a free one.
ReplyDeleteThank you for your kind comment. I'm sorry you got stuck - how frustrating for you. I wonder if you attached the handles to the wadding side rather than the fabric side? I think that would result in them being inside when you turned the carry cot right side out. I hope you can work out how to correct the problem with the handles and finish your project.
DeleteThat is exactly what I did.🥴 It was a little hard on my almost 80 yr old eyes taking the stitching out and doing it again correctly, but I succeeded!! Now I am doing the pillow and blanket. If I can figure out how to send a picture, I will. Thank you so much, again.
DeleteI'm so glad you finished the little bed and enjoyed making it. I've added your picture - thanks for letting me share it.
Delete